Thursday, October 15, 2015

How's It Hanging?


Behold! You are looking at something no human has seen for 50 years!

"The doors are closing."
Stunning, isn't it? Two closed doors. I've rarely seen a more beautiful sight.

Perhaps some explanation is in order. These two sliding doors separate two of our ground-floor rooms. They're normally open, so that you can walk between the front room and the "middle" room downstairs. Nobody pays much attention to them because, well, they're open all the time.

The reason they're open all the time is because they're stuck. They've been stuck in place since before we bought the house, and probably long before that. But no more! Today, we got them working again.

Both doors are solid wood. They're more than eight feet tall, four feet wide, two inches thick, and extremely heavy. In short, they're massive, even by Dr. Hart's standards. And they were stuck in place.

Close up of the door-suspension hardware.
They're supposed to travel on a hidden track up above the lintel (door frame). There's a hidden trolley track up there, and each door has two big metal trolley wheels that ride on the track. The doors just hang from those two wheels; there's nothing at the bottom or the sides to hold them in place or guide them. They're simply suspended, with about one-quarter inch of clearance above the floor. Or at least, there's supposed to be.

Some time ago, some bozo must have tried to force the doors open and knocked them off their tracks. And there they sat. Fortunately, the track mechanism is such that the doors didn't fall down -- someone would have been killed if they had -- so they just kind of stayed stuck in place. And since they were stuck open, nobody apparently bothered to try to fix them.

Now I understand why. That track mechanism was not designed for easy maintenance. It's hidden up in the wall, out of reach of even the smallest fingers. It's clear now that the trolley track was constructed and installed first, and then the walls were framed and plastered around it. There's no way to get at the workings without busting through the original plaster and lath, and we weren't prepared to do that.

Trolley wheel off its track, leaning against a stud.
We could shine a flashlight into the gap between the door and the wall and get a glimpse -- just -- of the misguided trolley wheels. But how to fix them? There's no room to reach a hand in, and they're too far away to reach with tools. We tried a crowbar. Too thick. We tried a skinny screwdriver. Too short. We tried forcing the doors to move with a pry bar, thinking that maybe we'd get the wheels to skid along the track even if they are misaligned. No dice. Both doors were hitting a hard stop somewhere and refused to budge.

Not only were the wheels off the track, they were also trapped against the wall studs, which kept the doors from sliding no matter how hard we pushed. When the wheels jumped the tracks they came to rest at a crooked angle. There's not enough room in that tight space for the mechanism to roll, skid, or slide without catching on something, so the whole works was jammed up behind a wall stud (on the left-hand door) and an iron gas pipe (on the right-hand door). We were well and truly stuck.


Mechanical door catch and wooden bumper.
Meanwhile, these massive doors are still hanging from the wheels. There's nothing else holding them up. So we can't just gently massage the hardware back into place. There's hundreds of pounds of redwood weighing the whole thing down.

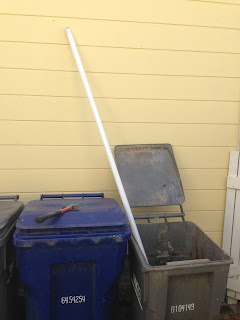
In the end, the fix was a two-person operation. Dad would call it "main strength and awkwardness." Kathy got on a ladder and pushed on the door, trying to take some of the weight off of the rear wheel. I stood on the ground and used a galvanized pipe (in one hand) and a flashlight (in the other) to reach up into the dark recess and push against the wheel -- hard. If Kathy and I timed our efforts just right, we could knock the rear wheel back onto the track just far enough that it would clear the adjoining stud and allow the door to skid/slide/roll partway along the track. Hooray!

Repeat for the other door, and we're good. Double hooray!

The offending gas pipe.
Now that the doors move again, we could slide them completely along the track and out of their pockets. That allowed us to clear decades of debris from the track and shoot a little WD-40 onto the wheels. There's also a clever little iron gadget on each door that prevents it from accidentally moving too far. It catches a hidden latch inside the wall unless you know where to reach in and flip the lever over. We cleaned that, too.

I can't think of a way to prevent the wheels from someday jumping the track again. There are lots of ideas, but no practical way to implement them when you can't even reach up into the track. I guess we'll just have to be careful about how we push on the doors. In the meantime, I'm parking them fully closed. Just because we can.

Monday, October 5, 2015

Let's Play a Game


I have a fun game for you. It's a guessing game. Any number can play. Let's begin.

Here is a picture of a wood floor. How many staples do you see in the floor? Take your time...

Do you see five staples? Ten? Fifty? More than that?

The answer is: We don't know! See? It really is a guessing game! You get to find them all without seeing them first. Kathy and I play this game for hours.

I wish we could recycle staples for a penny apiece. We'd be rich! Instead, we just dump 'em in the trash along with the broken tack strips, the dust, and the shredded padding.

Here's another guessing game. What were the previous owners doing in this picture? My guess is that they were spray-painting a piece of furniture. See where the two round legs and two rectangular legs were standing? It must be fun to spray paint things in the middle of your own bedroom. Later, they must have set a paint can down on the floor, in two separate places. It sure left a nice ring for posterity.

Underneath all the unintentional paint is a solid layer of dark brown. And under that is another layer of brown paint in a slightly lighter color. As far as we can tell, the floor in all these upstairs rooms was painted brown, twice, before giving up on it and laying carpet -- also twice.

When we removed all the carpet staples, we found that some of them had little pieces of green padding trapped under them. But we've never seen any green padding, so our guess is these were left over from an earlier carpet job. So between the two coats of brown paint and the two layers of carpet, this floor has been refinished at least four times in its 120+ years. Not surprising, I guess.

The wood itself is inch-thick redwood tongue-and-groove. No knots anywhere. The boards are 5-1/4 inches wide and have a rough finish underneath but a fairly smooth finish on top. Or at least, they did. Years of abuse have gouged the top surface pretty badly, so now it's dented in places, as if they were juggling bowling balls up here. A few of the boards have been cut away to expose something underneath, but it's not always obvious what they were trying to get to. One opening exposes the ceiling fixture in the room below, but a couple don't have any obvious purpose. We'll keep thinking on that.

The floorboards also change direction in odd places. They'll run north/south for a while, then change to east/west orientation in the middle of the hallway, for example, or partway through a room. Our assumption is that the current walls weren't here in 1893, and that the walls have been moved since -- perhaps multiple times. It doesn't make sense to change the orientation of the floorboards arbitrarily unless the underlying joists change there, too. Hmmm... something else to explore.

Dept. of the Interior, Floor-istry Divison


If defenestration means throwing stuff out a window, what do you call it when you pull up an entire floor? De-floor-estation?

This week we got a bug in our bonnets and finally removed the last remnants (hah! See what I did there?) of carpeting in the house. The entire third floor had wall-to-wall carpet of indeterminate vintage. Probably from the 1960s; possibly as new as the 1980s. Definitely not staying, either way.

We'd pulled up the carpet in Kathy's upstairs office four years ago almost to the day, and found a fairly ratty wooden subfloor underneath. It had paint splatters, cuts, gouges, and various indignities that made it not worth trying to resurface. We'd left the carpet in Jim's office, the guest room, and the adjoining hallways... until now. They also had paint-splattered subfloor underneath, often with chunks cut out and patched. Clearly, the previous owners had given up on this flooring. They'd cleaned paint rollers, dripped paint, and spray-painted furniture right on the floor. This area was never meant to be exposed.

Our plan is to resurface the entire third floor with hardwood, like the 1st and 2nd floors already have. But to do that, we've got to pull up all the carpeting. Piece of cake. The demolition is always the easy and fun part.

Pulling up carpet is sort of like moving: You have to pack up all of your belongings and put them somewhere else. There's no magician's trick of yanking the carpet out from under the table, so we played musical chairs with all the beds, desks, file cabinets, forgotten boxes, and whatnot. First, you shove everything to the left, then tear up half of the carpet, then shove everything to the right and pull up the other half. A good sharp knife allows you to rip the carpet down the middle and roll it up in halves, like a gigantic fuzzy burrito.

Old carpets aren't particularly sanitary, either. Kathy and I both got new respirator masks and wore them the whole time. They're hot and uncomfortable, but the alternative was... ick.

Under the carpet, of course, is the padding. In some ways, it's more trouble to remove than the carpet because it doesn't cut neatly. Instead, it tears into irregular pieces, so you have to chase around the room and get all the bits from everywhere. We went through an entire roll of masking tape just binding this stuff together. There's a trip to the dump in our future!

Then comes the tedious job of removing all the nails, staples, and tack strips. Tack strips are vicious, nasty things with hundreds of sharp nails pointing straight up, ready to catch your fingers, clothes, and tools. They're designed specifically to be painful. (They may also have some incidental use as carpet fasteners; I wouldn't know.) We got to make a lap around each room prying up the tack strips and trying to toss them into a garbage can without hemorrhaging.

Next come the staples. Lots and lots of staples. The padding is stapled down -- quite thoroughly -- all over each room. That's why the old padding shreds and rips when you pull it up. It's held down with several hundred staples (no exaggeration). But before we can put down hardwood, we have to remove all the staples and make the subfloor smooth.

The bad news is, speckled paint splatter makes almost perfect camouflage. You can't see half the staples. You have to feel for them, then pry them up with a screwdriver or pull 'em out with pliers. So you run your hand over the floor, go "ouch!," pull out the offending staple, and repeat.

The good news is... well, there is no good news. It's just plain tedious work, down on your hands and knees pulling out hundreds and hundreds of perfectly camouflaged staples. At least Cinderella got a clean floor when she was done. We just have a paint-splattered floor that looks exactly as it did when we started. But with fewer hazards for bare feet. Stay in school, kids, and get a nice quiet office job somewhere. Otherwise, you may wind up like us.


Sunday, September 20, 2015

Parade... Right!


We call this the Parade Deck, which makes it sound like the aft end of a cruise ship. We could just call it "the deck," but even that's too grand, since its average elevation is zero inches. It's not so much a deck as it is flat landscaping. A wooden dirt cover, I guess.

We have a lot of parades and street fairs here in town, and most of them pass conveniently in front of our house. Free entertainment! Kathy and I have taken to putting lawn chairs on the front porch to watch, but the porch is so small that the chairs block the front door from opening. We can either sit or enter/exit the house, but not both. It's awkward.

So we decided to build ourselves a little outdoor observation platform for street entertainment (OOPSE) that would give us a place to sit while also covering up some of the loose dirt in the front yard. We can't decide what to plant in the front, and the current drought means we couldn't water anything anyway, so why not just cover it up?

Hence, the zero-height deck. It's completely over-engineered, with eight concrete piers sunk into the dirt, galvanized anchors everywhere, and pressure-treated 2x6 lumber holding it up. And by "up" I mean down. Our lot slopes from back to front, so the deck necessarily is higher in the front than in the back. Or to put it another way, the deck itself is level, but the ground rises up to meet it in the back. And since we wanted the front to be an easy step up from ground level, that forced the back end below grade. So we didn't so much raise a deck as excavate it. This is obvious from the big pile of leftover dirt.

The top is planked with redwood 2x6 alternating with 2x2. It looks nice and should wear well. Of course, we painted it to match the rest of the house. I did my best to match the curve of the front porch steps nearby, but I'm not as talented as those builders. I did get to buy a new router bit, though. So there's that.

You'd think that building a tiny deck at ground level on a warm summer day would be a piece of cake -- it's Home Depot 101 stuff -- but of course Murphy had to stick a finger in our eye. Sinking the concrete piers was easy enough because the soil is very loose and easy to dig out. Even getting them all level with each other wasn't too bad, again because of the sandy soil. But wouldn't you know it, there was a steel rod buried under the ground exactly where we needed a pier to go. At first, I thought it was just a piece of scrap metal and that I could dig it out with my hands and throw it away. Nope. The more I dug, the more it didn't want to move. Hmmm... It was old, rusty, and about a thick as my thumb. And very solid. It must go really deep. That's a lot of metal. No problem, I'll just hit it with this sledgehammer...

Even with my biggest 16-lb. sledgehammer, the thing barely moved. It didn't even wobble in the dirt. But it did make a funny sound... kind of like... a water main pipe. Stop! Evidently this was the original electrical grounding stake that was clamped and/or soldered to the main cold water pipe coming in from the street to the house. That means it's buried deep and I really don't want to try to disconnect it. Instead, I got out the angle grinder (more power tools!) and just cut it off. Ooh, sparks! Pretty.

So apart from that, the project was pretty straightforward. And the weather has cooperated, because Kathy and I have been able to sit outside on our new "deck" almost every evening, enjoying the warm weather. All we need now is a parade.


Monday, September 7, 2015

Hot Dipped Galvanized!


Redwood and zinc just go together, don't you think?

The back steps from our kitchen down to the sidewalk had started to rot and needed to be replaced. We knew they were getting old and starting to give way. The wood was getting spongy and the steps had more of a bouncy spring to them than is strictly necessary. It was just a matter of time before someone put a foot through one of the boards. Our hope was that one of us would be the first victim, and not a guest or lawyered-up visitor.

Anyway, the steps aren't very complicated, and there are only two of them, so how hard can it be, right? Well... Nothing was level, plumb, or parallel, so the geometry was a bit tricky. The porch itself slopes slightly from left to right to shed water. It also slopes from back to front so that water doesn't puddle next to the door. So that's the first challenge.

The concrete sidewalk also slopes, again in both directions. It's a bit closer to the house on one side than the other, in addition to the obvious right-to-left slope. But the steps themselves have to be level or it'll feel funny to walk on. No problem. That's what circular saws are for.

Demolishing the old stuff is always fun, and this time it came with one of those $^&@#!! moments when you wonder how the thing ever held together in the first place. There was no apparent support under the steps. No wonder they bounced; they were floating in midair. Foundation consisted of dry-stacked bricks lying in the dirt. Mortar? Nah, we don't need that. I think the 27 coats of paint is mostly what held it all together.

The good news was, the porch itself was in pretty good shape. The surface is 3" tongue-and-groove that we really wanted to preserve if we could, and it looked sound so we left it alone. The porch is covered, so the weather damage was limited to just the stairs, which had to be rebuilt anyway. So there's that.

They say the five most expensive words in remodeling are, "as long as we're here..." but that wasn't the case this time. The deck was solid and even the supports underneath were in good shape. I don't know how old the support structure is, but the 2x6 lumber had square shoulders and really did measure exactly 2" by 6", so it's probably older than me. Another win.

But as long as we're here... I took the opportunity to shore up some of the structure anyway and added three new concrete piers, including one right in the middle of the stairs. That should keep the new stairs from sagging for another 50 years or so.

All the new lumber is heart redwood, because that's what the entire house is built from. It's kind of a shame, because we're going to paint over all of this and nobody will see the nice redwood. Still, it would seem like cheating to use Douglas fir or pine on something like this. So gimme the good stuff.

If you've never built stairs, it's surprisingly tricky. Or maybe I'm just an idiot. Seems easy, right? Nice right angles. No curves. Everything regular. But I must've spent hours staring at the open gap, scribbling in my notebook and taking the same measurements four or five times. C'mon, it's only two steps! There's a 7/11 rule of thumb for stairs: 7" vertical rise and 11" horizontal tread is considered comfortable and safe. You can stray from that a little bit, but whatever you do, make all the steps the same. I adhered very close to that standard while also making sure that the finished project fit into the existing deck and sidewalk. The folks who built this place in 1893 certainly weren't working to the same code specifications.

After the new concrete set up and the support posts went in, it was time to frame up the new stairs with new stringers. I imagine you get good at this with practice, but I spent an embarrassing amount of time checking and rechecking to make sure everything was plumb, level, and evenly spaced. Once you make a few critical cuts you can't go back. Remarkably, everything lined up just as expected.

So here are the new steps in all their raw redwood glory. I routed the front edges of the steps to give them a bit of a rounded profile, and so they don't look like they just came from the lumberyard. There's also a bit of cove molding underneath the nose of each step to copy the old steps that came out. It's all held together with galvanized nails, which should postpone rusting for at least a few weeks until Kathy has time to paint it all over.


Take the Dirt Road Home


We stumbled across this old photo in the City Hall office the other day. It shows some schoolchildren crossing the main street through town, as the partial caption shows. The interesting part is that the street is still unpaved dirt, and that our house is in the background.


The light-colored building on the far left is the Gosby House Inn, a B&B that's our next-door neighbor. It's been a boarding house or inn since the very beginning, and currently has 22 rooms, I think.

But right next to it is our house, which is darker and partially hidden behind a telegraph pole and a tree (neither is there anymore).

Since our place was built in 1893, that means that Lighthouse Avenue, the main street though town (and the only route to the Point Pinos Lighthouse, hence the name), was still unpaved at least that far back. We know that a horse-drawn trolley service used to run up and down this street, and that may or may not have come later than this. I almost think I see a trolley track under someone's foot, and it wouldn't be unusual for trolley cars to have run on dirt streets in the 1890s or early 1900s.

The other interesting detail is the wrought-iron railing on top of the roof for the "widow's walk." At first, I thought both buildings had one, but it actually looks like only ours had it. It's certainly not there now, but we've been itching to replace it... someday.

By the way, the dark house color in this photo (and a few others) was a big help to us when we started painting the house a few years ago. Remember, it was solid white before we started, and a few of the townspeople grumbled and complained that we shouldn't be adding any new colors because "it's always been solid white." Uh, no. Not even close. Victorian-era houses were very rarely white, partly because that just wasn't the style, but also because white (i.e., lead-based) paint was very difficult and expensive to make. Most houses, like ours, were dark-colored. Apparently the Gosby family was more affluent than the Harts.

1951 - 2015


Monday, June 22, 2015

Mercury Rising


It's tough keeping up with the latest changes in ecological correctness. As we remodeled the downstairs kitchen, we removed all of the fluorescent ceiling lights. The Health Dept. says we can't have bare bulbs in a food-preparation facility, presumably because the bulbs might spontaneously shatter and fall into the food. Okay, but since we couldn't find any light covers that fit, the entire fixture had to come out.

We had a total of three big fixtures, each one with fluorescent tubes that are six feet long (!). Taking down the fixtures is easy. It's disposing of the bulbs that's tricky. Standing up on the ladder, reaching over my head, I was scared that I'd drop one of these things and it would shatter into a million pieces all over the kitchen floor. Turns out, that's not really a problem.

Once I got the bulbs down, I tossed them into the garbage can, thinking they'd break up into little glass shards. Nope. These things are surprisingly tough. Ironically, they're tougher than the plastic "safety covers" that go over them, so the Health Dept. might want to rethink its rules.

Since they didn't politely crumble into pieces when we threw them away, I put on a pair of goggles, wore heavy gloves, and wrapped an old blanket around each tube and hit it with a hammer. You know, kind of a gentle tap, tap, tap. Not good enough. Hit it a little harder. Knock, knock, knock. Still no good. Finally, I took a big swing and really pounded the thing and then it broke. Jeez, these things could be used in track & field events as vaulting poles. They're tough.

They also give off a lot of white dust when they break, kind of like hitting two chalkboard erasers together. I'm certain the dust is poisonous, but I was outside so that makes it okay, right?


Thursday, May 14, 2015

The Storm Before the Calm


You know how it seems like distant deadlines are always a long way off? Like you have all the time in the world to finish that report, or build that bench, or clean up the guest room before company comes because, hey, they're not coming for another two months, right?

And then the deadline sneaks up on you.

We've been living that for about two years. "Eh, we can open the tea rooms whenever we want. We've got tons of time. Besides, we're practically done already. There are only one or two little things we still need to do..." Sound familiar?

Kathy picked Mother's Day weekend (May 9-10) for our grand opening, and we figured that gave us plenty of time for those one or two little things that still needed to be completed. How tough can it be? But as the date approached, we realized there were all sorts of little things that still needed attention. So it started to get a bit frantic around here. Not enough teacups. Need to order butter. Got to buy strawberries, but not too early or they'll go bad. The floor needs cleaning. Where are we going to put the big water urns for making tea? I know; let's build a table for them and put it right here, but first we have to find table legs and then put together a table and then anchor it to the wall so the table doesn't fall over and spill all the hot water on the floor if someone catches an apron on it and where are the AC plugs for the stupid things and we're running out of time we haven't even started cooking yet and the phone is ringing and, oh yeah, what do we do with the phone if it rings while we're serving guests do we answer it or ignore it or turn off the ringer so nobody hears it, yeah that's a good idea but oh wait what if someone is calling to cancel their reservation we'd need to know that, but only if we're going to reassign the table to someone else but maybe we don't want to accept walk-ins on our first day so let's not do that and do we have enough milk?

Eventually we got on top of it. The house was all ready, the ingredients had all been ordered and delivered, some of the long-lead cooking had begun, the dishes were all washed (we had to wash all the brand new plates and glasses before first use), and the tables were set. Nothing can go wrong now.


Worst Job. In the World


As part of our initiation into the exciting new world of foodservice, Kathy and I were introduced to the concept of grease traps.

As the name might suggest, grease traps serve to, uh, trap grease. They're a necessary part of the plumbing in any restaurant because they prevent all the kitchen grease from going straight down the drain. In a normal home, that's not a problem. You can pour the occasional pan of bacon grease down the drain without major fear of clogging the municipal waste-treatment system. (It's still not a good idea, because you might clog your own drain, but that's not the city's problem.) But if every restaurant and coffee shop in town did the same thing, you'd have a major biohazard clogging the public sewer system. So you have to install grease traps.

I say grease traps, plural, because every drain pipe that exits the house needs its own grease trap. If you have two sinks, for example, they both need a grease trap. Otherwise, what would be the point? The local Health Department wants to make sure you're not tempted to pour the grease down that drain instead of this one and bypass the grease trap.

Fortunately for us, the house came with two grease traps already installed. Unfortunately for us, they're huge big ugly things that take up space in the backyard. Imagine a rusty steel coffin, about six feet long, three feet wide, and three feet high. So a duplex coffin, then. There's a big steel lid held down with bolts and wing nuts that unscrew (or would, if they weren't so rusty). Black. Rusty. Very heavy. And mandatory.

Expensive, too. We were told not to throw out the grease traps (as if "throwing out" a 300-pound object was an option) because they'd cost about $5000 to replace. Okay, then. We're keeping them right where they are.

So they've been sitting outside in the rain for the past several years, collecting rust... and grease. One of the two was disconnected from the household plumbing a long time ago when the previous restaurant decamped, so it's just sitting there taking up space. But the other one has been straining our downstairs kitchen water the whole time. And we've put some nasty stuff down that drain.

Anyway, before we could open the restaurant we had to get the grease trap(s) cleaned. That's part of the charm of grease traps: they filter out and accumulate all the icky stuff -- stuff too nasty for the sewer system, if that gives you any idea. So they need to be cleaned out on a regular basis.

There are people who do this for a living.

We're surrounded by restaurants here, so it wasn't hard to discover who cleans these things. Just watch out the window for a few days and, sure enough, you'll see the big tanker truck from Salinas Tallow Company show up, pull a hose around the back of the neighboring restaurant, and start pumping, ahem, "tallow" out of the grease traps. So we called the number on the side of the truck, made an appointment, and a few days later we met Steve.

Nice guy, Steve. But I gotta tell you, he has the world's worst job. Like being an Army private or a proctologist, I'm glad that there are people who do it, but I'm also glad that I'm not one of them. Steve can have my money. Just don't make me watch.

Actually, I did watch. Call it morbid curiosity, but I really wanted to know what the inside of our two big tanks looked like after years of restaurant service followed by years of neglect followed by years of our mistreatment of it. It hadn't been cleaned in at least 8 years -- our neighbors cleans his weekly -- and it's probably been longer than that. I doubt the restaurant cleaned out its grease traps on its final day of service. Who knows what kind of crud would be in there. Would there be a thick layer of fat? A toxic brew of chemicals? A decomposing body? And how bad would it smell? Little boys need to know this stuff.

Time to lift the lid. Steve and I took turns twisting off the rusty wing nuts from their heavy steel bolts. When that didn't work, we used a hammer to knock the bolts loose. When the last bolt came off and the lid was free I admit I took an involuntary step backwards.

The reality was... somehow disappointing.

The first trap, the unused one, was empty. Steve didn't even charge us to clean it. The second trap, the one that's been in service all this time, was full of water and a bit of floating debris, but nothing noxious or overly disgusting. Kind of what you'd expect to find in the bottom of a kitchen P-trap. Just more of it. No gurgling miasma. No severed hands. Steve took about 30 minutes to suck out all the water with the big hose, plus a few more minutes to scrub the tank with a big brush, before putting the lid back on. That was it; thank you very much; I'll be on my way.

In talking with Steve (from a safe distance), he mentioned that he and his wife might like to come back and visit the tea rooms some day. Maybe for her birthday, he said. I really hope he changes out of his work clothes first. And that she's not a proctologist.


Cardboard Holds No Fear For Me


"Unboxing" is one of those weird modern fads that you can blame on the Internet. People videotape themselves opening a new gadget right out of the box. A new computer, a new cell phone, a new toy -- whatever. Then they post the video online for everyone to watch. It's apparently very popular. It's also pretty weird.

Kathy and I are becoming experts at unboxing. We've bought so much stuff for the restaurant that the UPS and FedEx drivers literally bump into each other on the porch. Both trucks will be idling out front as one driver brings a box up the steps while the other one heads back down. I half-expect one driver to hand the other a Pepsi.

But after we unbox all of our nice new dishes, or glassware, or mixing bowls, or whatever, we've got the cardboard boxes to dispose of. Normally, that isn't a problem. You flatten the box and put it out with the trash and other recyclables once a week. But now we've got so much cardboard that we're running out of places to put it all. We've piled up boxes outside until they start to tip over. We've got boxes on top of boxes. We've got a new pile started in the dining room, and another pile in the kitchen by the back door. We don't even flatten them any more; there's no time.

I have to admit, the six-year-old part of me looked at some of the boxes and thought, "Ooh, that would be fun to play in! And that one would make a great fort!" We may have considered keeping some of boxes for our infant granddaughter to play in. "Hey, in three years she'll love this one!" But that would have meant storing it somewhere.

And then there's the Styrofoam and the bubble wrap. Sure, popping the bubbles is fun for a while, but when you're looking at hundreds of feet of the stuff its charm begins to pale.

I made the mistake of putting a box of Styrofoam peanuts outside. Next morning, the little white things were all over the yard, underneath plants, and stuck under the stairs. They get everywhere, and they're not easy to chase down. Stupid peanuts.

Fortunately, last Monday was our once-a-year special "all you can eat" garbage day. The trash haulers allow you to put out a nearly unlimited quantity of almost anything you want. It's a great time to dispose of accumulated extra trash, and it couldn't have come at a better time. Kathy and I spent quality time together in the backyard slashing open boxes, flattening cardboard, corralling foam into trash bags, and generally disposing of the detritus of a new venture. We mastered our trash monster. But next time, I think we're going to burn it all. And post the video.


Thursday, March 26, 2015

Sign o' the Times


Our new sign got installed!

We've been working on a logo for the business off-and-on for about a year. Kathy and I quickly realized we can't do it ourselves, so we hired somebody creative to design one for us. We had all sorts of clever ideas about integrating the "hart" (elk) into the logo, incorporating an outline of the house, adding swirly Victorian elements, etc. In short, we were probably a graphic designer's worst nightmare. "Oh, goody. Customers who think they know what they're doing..."

Eventually, we hit upon a design and a designer that we really liked. He's done a number of signs for local businesses around here, and we've always admired his work. His initial designs were a little too elaborate, with 3D pop-out deer and cute hearts, but in the end we think he got it about right.

The sign itself is made from a block of solid red cedar that's been sandblasted to give it a wavy textured background pattern. The main lettering is laser-cut from PVC (the same stuff they make sprinkler pipe out of) and will last more or less forever. The smaller lettering is expanded foam. The whole thing weighs maybe 100 pounds or so.

The black signposts were already here -- they held up the previous restaurant's sign -- but the top bar had rusted badly. No way it was going to hold up the new sign. Replacing it turned out to be pretty easy. I cut off almost the entire bar, leaving short stubs at either end. Then I rummaged around the local welding shops looking for inch-and-a-half square stock, the same size as the original bar. I also got some scrap pieces of square stock that were slightly smaller in cross section -- just the right size to slip inside the hollow cut-off ends of the old bar and support the new bar. A couple of metal screws and some JB Weld, and it's all as good as new. I can even disassemble and replace the bar again if I need to.

One nice side-effect of hanging the new sign is that we'll probably get fewer misguided visitors who want to check into the B&B next door but drag their suitcases up our front steps instead. This makes it pretty clear that we're not the local inn. On the other hand, if you try to make something idiot-proof, you just encounter newer idiots.

Bringing Home the Hardware


A lot of the "remodeling" lately has had less to do with making the house livable, and more with outfitting the business. Which isn't to say it's been easier...

Exhibit A is the collection of pots, pans, dishes, and glassware we've accumulated over the past few weeks. It's like moving to a new house after all your old stuff was lost in a fire or something. We need cooking utensils, forks, knives, and spoons for 30+ people, spatulas, mixing bowls, cutting boards, and so on. And most of the new stuff has to be NSF approved for commercial foodservice, so we can't just pop over to Costco or Target or Amazon and get what we want.

Instead, we've set up accounts with a handful of big foodservice distributors and have starting raiding their catalogs for hardware, like these pots and pans. The biggest surprise -- they're cheap! Most commercial stuff is stupidly expensive, but this 10-inch aluminum saucepan with the red handle was just eight bucks! (Actually, the handle was not included, and cost an extra $2.95.) Heck, for that price I can afford to ruin a pan a month and still stay in business. My next step is to season them all, which promises to use up a lot of vegetable oil and produce a lot of smoke. Should be fun.

Over in the "front of the house" (see, we're learning restaurant lingo) Kathy has assembled all the dishes and dinnerware we need. Every few days the UPS driver brings us a carton or two of bulk wineglasses, or plates, or those little ceramic sugar-packet holders. I never paid much attention to that stuff when we're eating out. Now we've got to find it all and bring it in-house. And find someplace to store it.

Some items seemed oddly expensive, like salt and pepper shakers, compared to wineglasses, which are pretty cheap. I'll remember that the next time I'm tempted to swipe goods from a restaurant table. And we found some beer glasses that can double as water glasses (we'll likely serve more of the latter than the former).

And of course, we have teapots. Lots and lots of teapots. The lids on these ones stay on pretty well, so we don't expect too many messy accidents.

The biggest downside to all this is the packing material. We've been going through a lot of cardboard boxes lately. Too many for our garbage company to handle, so we accumulate cardboard out in the backyard, where it gets wet overnight. A weekly chore is cutting up soggy cardboard and stuffing it into the recycling bin. Nobody told me the new business would be like this.

Tuesday, March 3, 2015

Turning the Tables


The tables are done, so now people have a place to rest their elbows when they sit. We made eight tables in total, four large and four small. Between these and the big dining room table we donated to the business, we should be able to seat about 32 people at once.

The tabletops are pine with pine trim around the edges. We put on two coats of stain, and then four or five coats of clear varnish. As usual, we did a very light sand in between coats, so it came out nice and smooth.

Wednesday, February 25, 2015

Getting the Lead Out


We went mining for metal in the front yard the other day. Not deliberately, of course. But these things happen.

Kathy and I were enjoying the nice weather all last week by gardening in the front yard. And by "gardening" I mean "pulling weeds." Almost nothing growing in the yard is there by choice. We just maintain the random flora as best we can, and try to eliminate the least-desirable ones.

I get bored easily, and so after dedicating a few strenuous minutes to weed-pulling, I found another project to occupy my attention. One that involves tools, electricity, and an element of danger. There used to be a big restaurant sign hanging out in the yard (and there soon will be again) that was illuminated at night. There are two lights atop the posts that hold up the sign, and two more lights down in the ground that shine up onto it. The wiring was getting old and ratty and really needed to be redone. Since Kathy had so conveniently removed all the weeds from that area, this seemed like a good time to redo it all.

The DPO* seems to have had a strange attitude toward electrical safety and code compliance. In some places, the 110V wiring was encased in conduit (metal in some places, plastic in others) and buried about a foot underground. No problem there. But in other places, the high-voltage wires were just sitting in the dirt inches under the soil. We've hit this wire with a shovel more than once, and the weed cover was about the only thing protecting it. With the weeds gone, the wire was often exposed, just lying on the ground. Not ideal.

So out it comes. I dug up all the 110V wiring, whether in conduit or not, traced it back to its source, and laid new conduit with fresh new Romex. And it only took me four trips to the hardware store! You know how it is: Once you get started on a fix-it project you think, "as long as I'm here, I might as well..." So the scope of the project keeps changing. And you never seem to have the right combination of elbows and unions in your junk box, do you?

Anyway, when it came time to cut off the old, dirty wires under the weeds, I was having a hard time. My cutters didn't want to nip through the wire as easily as usual. Hunh? That's strange. I know the wire's dirty and kind of stiff, but that's just encrusted mud, right?

Nope. Turns out it was encased in lead! Cleaning off the outside of the wires revealed a lead casing wrapped around it, like metallic Romex. I'd never seen that before. It had the usual 18AWG solid-core copper wires inside, but the outside was a thick jacket of this soft metal. Well, that explains how it held up to all those shovel strikes for so long.


*Damned Previous Owner.


Friday, February 6, 2015

A Bit of a Foot Fetish


This house requires a lot of woodworking. Good thing we've got a lot of wood. And sandpaper. And power tools!

Down in the kitchen, there's a doorway that needed some trim. It had been removed at some point in the past and replaced with simple, flat boards. We wanted to restore the original fancy redwood trim. Luckily for us, there was another door that had had its trim removed, and we could reuse that. Unluckily for us, only some of that old trim remained. The rest we had to fabricate.

We put up the reclaimed trim back in October, but it was heavily damaged, so we had to add onto it with some homemade prosthetics. Once that was all stripped, sanded, and painted, it looked pretty good.

Abraham Lincoln reportedly said, "a man's legs should be long enough to reach the ground." But our trim did not. The original doorway and the new doorway were different sizes. The reclaimed-and-patched trim was a bit too short. And the little footer pieces that sit at the base of the trim were lost, so we'd have to fabricate those from scratch.

I started with some leftover redwood molding that we'd used to repair windowsills when the house was painted last year, added some redwood stock to the bottom of it to get the right height, and put a pine backer on the whole thing to get the right thickness.

It's not an exact match for the original footer, but it's close enough. I wish now that I'd turned the redwood stock 90 degrees so that the grain ran horizontally to match the molding, but since it's getting covered with paint it won't matter. Still, it bugs me.

Here's a finished footer installed next to an original (and badly banged up) doorway. The new footers are a bit taller because the doorway is taller than its neighbor. After the first coats of primer and paint, I could see that the new pieces looked too "new," so I sanded off all the square corners and nicked and scratched it in a few places. On top of the footer, the left one-third of that vertical door trim is all new, too. I figure in about 20 years and another 15 coats of paint it will all look just like the original.


Tuesday, February 3, 2015

All Your Base Are Belong To Us


Sing it with me: "It's beginning to look a lot like... a restaurant."

We got our chairs a few months ago, and now we're getting tables. It turns out, restaurant-supply places all have ugly tables. It's easy to find your basic Formica countertops with steel table legs, but a lot harder to find something that doesn't belong in a diner.

So we approached the problem piecemeal. Let's find good table bases we like, and then find separate tabletops to put on them. Only half of that plan worked.

We did finally find some nice table bases. They're heavy, which means they're awkward (read: expensive) to ship. We got eight of those: four for smaller tables and four larger ones. The smaller ones will accommodate two-person tables, while the larger ones should seat four.

Then we went hunting for tabletops, and that was a complete bust. Discouraged and disappointed, we suddenly had the aha! moment. If we're going to cover them with tablecloths anyway, who's going to see the tabletops? Let's make our own. How hard can it be?

Right now we're about halfway through the process. We've assembled all of the table bases and bought the wood for the tops. Yesterday I built the first four tabletops; the next four are today's project. They're 3/4-inch pine with 1x1 pine molding around the edges. Once they're sanded we'll stain them a nice dark color and finish with a few coats of clear varnish. That should give the tabletops a nice smooth finish that repels water and won't snag tablecloths.

I'll let you know how it goes.

Wednesday, January 28, 2015

I Am Tin Man


No sooner had we put up the new shelves in the kitchen than they had to come back down again. The tin tiles we ordered arrived yesterday and they got installed today. Ta-dah!

These are reproduction tin ceiling tiles that we're repurposing as a backsplash. The county health department is okay with that, and we like the look better than your traditional tile, Formica, or composite material. The hardest part was picking a pattern (there are lots of different ones) and then picking a finish color (there are lots of different ones).

The other hard part was cutting openings for the electrical outlets. I carefully measured -- twice -- and then jabbed a starter hole in the tin with an ice pick, before using tin snips to cut out a rectangle. The trick is to cut through the tin tiles without bending or distorting them too much. Tin snips are not good for delicate surgery. I've got the sliced fingers to prove it.

These are individual tin tiles, embossed with a round-ish pattern and hand-finished in a sort of copper color. They're glued to the wall with industrial adhesive; I may add a few nails, too. In a day or so, when the adhesive dries, I'll run a bead of silicone around all the edges to make the backsplash watertight and keep crumbs out. Then the lower shelf will go back up. Should be nice.


Tuesday, January 20, 2015

If You Can't Stand the Heat...


The downstairs kitchen is nearly functional now. In fact, we cooked part of Thanksgiving dinner and most of Christmas dinner here. It was very handy having the double oven, big burners, and industrial-sized refrigerator right outside the dining room table. Makes it easier to cook and serve without dragging everything through the house.

(Side note: In all the time we've lived here, we've never eaten meals on the same floor we've cooked them. Food always seems to go up/downstairs. In the very beginning, both kitchens were nonfunctional, so we plugged in a cheap toaster oven and carried our TV dinners up to the second floor to eat. Then we remodeled the 2nd-floor kitchen but started carrying everything back downstairs to the family room. Lately we've been moving ourselves out of the ground floor in preparation for opening the business, so now we eat on the 3rd floor. Crazy. Christmas was pretty much the first time we've been able to eat without climbing stairs.)

The maple countertops went in just before Christmas, and the sink right after that. Once the plumbing and electrical work was done, I hung the cabinet doors and started loading everything up. Last week, we built some shelves; those got hung yesterday. We're still waiting on the tin backsplash, but apart from that it's just about ready to go!

We also got a freezer. At first, I wasn't sure we'd need one, and didn't want to waste what little space we have, but really, the need became apparent after awhile. It's a freestanding unit, much like the refrigerator, with a stainless worktop. Unlike most residential freezers which keep food at around 5 degrees, this thing operates at -10 degrees and below. It's cold! Makes it very handy for chilling beer glasses on short notice.

One side effect is that it keeps the kitchen nice and warm. Because physics. Any refrigeration unit will put out more heat than it takes in, so having a big refrigerator and freezer in a small kitchen keeps the place toasty. The place is noticeably warmer now (in January) than it was just a few months ago. I'm beginning to wonder if that extra heating duct that we put in last year will be necessary after all.