Monday, December 12, 2011

Naughty Bedroom Photos

I've been naughty. I need a spanking.

Kathy and I did a lot of, um, remodeling in the second-floor bedroom but I never posted most of the pictures. In fact, the bedroom is one of the first rooms we completed (as opposed to just started) so it really deserves special mention.

As you can see, it's quite nice. The room was painted "bordello red" like many of the other rooms in the house. After we pulled up the green carpet and refinished the floor, Kathy set about painting the ceiling and and hanging the wallpaper. The ceiling color extends a few inches down the wall to create a dropped ceiling, then there's wallpaper on the upper half and slightly darker paint on the lower half. The overall effect is very nice, we think.

We removed the old upper molding (picture rail) and lower molding (chair rail) and replaced them with newer ones that we painted white. For this room, I think the white moldings look pretty good, as there's already plenty of dark wood in the floor and furniture. The white window molding, picture rail, chair rail, and base molding go better with the yellow paint and wallpaper.

I'd initially had a grand plan to take off all the base molding and cut a groove in the back to hide new Romex. I bought a new router bit and everything. That plan didn't work. The base moldings won't come off without a lot of coaxing, and we didn't want to pry against the plaster walls. The best I could do was loosen up a few feet before giving up, so we painted them in place.

Finally, we ditched the dark-brown louvered closet doors and replaced them with new six-panel ones painted in complementary colors.

Monday, November 7, 2011

Does This Color Make Me Look Gay?


We spend a lot of time in our parlor (a word I'd never used in the first 48 years of my life). It's a nice place to sit with our coffee and newspaper in the morning or a glass of wine in the evening. It gets morning sun and affords a great view over the main street. You can even see the ocean from here. If we're not in the kitchen or flopped in front of the TV, we're probably in the parlor.

So why has it taken us so long to paint this room? It's been this dark-green color since we moved in, which went oh-so-well with the blood-red carpet. The carpet disappeared six months ago, but the walls remained green.

Until yesterday. Out came the paintbrushes, up went the ladders, and pop went the can openers. Three new paint cans, three new brushes, and three new rollers. We're in bidness.

First step: put primer over the dark green paint. I like to do primer coats because you don't have to be very good. It doesn't have to cover very well, and you don't really have to get everything. If I get 90% coverage I'm happy. I get to play with the paint without having to worry about feathering edges, cutting in, or any of that technical stuff.

After the primer comes the first color coat. We're using two colors: one on the walls and a lighter shade on the ceiling. I did the ceiling while Kathy started on the walls. If we do this right, we'll both finish at about the same time. We're a good team.

I'll just come right out and say it. We're painting the room purple. Yup, it's our lavender love lounge. Really, it's not so bad, and it complements the old wallpaper in the adjoining rooms (which may not say much for the wallpaper, I realize). The new color lightens up the room quite a bit.

Paint colors have funny names. Kathy will tell you that I deliberately avoid reading the silly names written on the back of the paint samples so that they don't color (sorry) my decision. I don't want to know that one shade of white is called Wedding Cake while another is named Shroud of Turin or Albino Bicuspid or something like that.

Case in point: Our new ceiling color is called Mystic Fairy. Really? Can you see walking into Home Depot and asking for a gallon of Mystic Fairy? "Would you like the matching lipstick with that, sir?" Stupid paint companies.

Tediouser and Tediouser


For a small garage, this thing sure has a lot of surface area. Doesn't that violate some kind of law of physics? Maybe it's a three-dimensional fractal. Mandelbrot's Garage.

Kathy tested this theory a few weeks ago by starting to paint the garage doors. Simple, you say. Yet somehow, six hours later, we still had more to go--lots more. This place is all nooks and crannies and tiny places inaccessible to paintbrushes.

Even the siding on the walls was more time-consuming than we imagined. We'd considered using a paint sprayer but decided that (a) too much paint would blow away in the wind, and (b) it'll be easy with a brush and a roller. "How hard can it be?" has been our mantra this last year or so.

After a few days of fair-weather painting, the garage is now mostly painted. The white part is about done, but we still have to paint the contrasting trim colors around the top. But that, in turn, requires permission from the city. More on that later.

Are You Board Yet?


Wednesday was woodworking day. And the project of the day was to strip and repaint the base molding in the upstairs kitchen.

That's trickier than it sounds because the kitchen cabinets are now in entirely different places than before, so none of the molding will fit back in its original location. Instead, we have to cut and combine pieces to fit the new arrangement. There's one long wall, in particular, that has no cabinets on it so it needs one long piece of base molding.

Which is what you see here. The molding is redwood, like most everything else in the house. It was painted white (also like nearly everything else), which is fine, except that the white paint was about the 23rd coat of paint on this miserable board. So rather than add a 24th coat, I stripped off all the old layers first, then primed and repainted it... white.


I did that to two of the longest pieces we had, then mitered and joined them together. I also took the opportunity to fill in some of the bigger gouges and holes with wood putty. I didn't want to make the molding look perfect (as if) but did want to remove some of the nastier bits of character it had acquired over the years.

Now that it's all done it looks like... white base molding. Big deal, I know. But that's two days of work yer lookin' at right there. Admire it. Now.

Saturday, October 8, 2011

WTF #28

This house is just full of surprises. As we pulled up the carpet in Kathy's 3rd-floor office we expected to find paint-splattered wood underneath—and we weren't disappointed.

What we didn't expect was this metal plate. It's galvanized steel and nailed into the floor right by the doorway. I'd say it measures about 12x18 inches. The nailing job is sloppy, like someone did it with the heel of a shoe.

I know I've got to pull this plate up, just to see what's underneath. Besides, we've got to replace it before we paint the floor; we can't just leave it here. But I'm postponing that little project for a few days. We've got company coming, and if this thing opens up a hole into another dimension or something I don't want to deal with it until after the weekend.

We Need Therapy

"We'll remodel one room per year. That's all."

Yup, we really said that when we first moved in. That was a year-and-a-half ago, and have we done 1.5 rooms? No, siree. We've done about eight rooms, the garage, and some of the outside. And today, just for giggles, we started on another one.

Please make it stop. Somebody plan an intervention. We can't help ourselves. We're sick, we know, but we're too weak to resist the strange urge to remodel, paint, stain, or just plain demolish. The toolbox and paintbrush call to us.

Today started out ordinary enough. A nice day where normal people go to the beach or have a picnic. But when I heard ripping noises coming from upstairs I knew what Kathy had gotten us into. She was ripping up the carpet in her office.

We'd been talking for months about removing that carpet, but always in terms of "sometime next year" and "no rush" and "we're not ready yet." The discussion always ended with, "we don't need another project."

And then the ripping noise.

It's so easy to start. Just pull up a corner of the carpet and there you go. But of course, once you start you can't stop. You can't leave the room with one corner pulled up and the rest still lying in place like nothing happened. You're not going to fool anybody. They'd know what you've been up to. No, once you start carpet ripping you have to go all the way.

It all came up pretty easily. That's the trouble. You can be done in less than an hour: Committed to refinishing the floor, moving all the furniture, and disposing of the carpet scraps and shredded foam padding. And the dust it kicks up is... too disgusting to think about. It's a filthy habit, I know. But we can't stop.

And like the floors downstairs, the wood under the carpet was completely paint-splattered. What were these people thinking? What combination of circumstances would have made that a good idea? The floor was previously painted wood, not stained like downstairs. It was dark brown, and they evidently sprayed (splattered, more like it) green paint on the walls, letting it get all over the floor in the process. They apparently knew they were going to carpet the room immediately afterwards, so they wasted no energy keeping the floor clean. Consequently, it's about half brown and half green. Charming. At first glance it looks fabulously moldy.

Anyway, now we're committed. The floor is bereft of carpet and the scraps are piled up in the garage awaiting our next trip to the dump (do they offer a frequent-customer program, I wonder?). Now Kathy and I get to sit on the floor with pliers and carefully find and remove the billions and billions of little staples and nails that held down the tack strips and padding. Every time we think we've found them all we vacuum the floor and find a few dozen more. Lather, rinse, repeat.

When that's all done, we'll strip away some of the old paint(s), fill in some of the gouges and nail holes, and then paint the floor again. (No staining for us; we've had enough of that for awhile.) But not right away. We're going to wait until after Christmas. Right.

Sunday, August 28, 2011

Deck, Deck, Goose


Immediately after the garage was finished (minus the doors) the contractors started on the rear stairs. We demolished the "original" stairs (actually built in the 1930s when the house was already 40 years old) because the city condemned them as unsafe. We knew this before we bought the house. We continued to use the old stairs for awhile, especially during last year's kitchen remodel, but after that it was time for them to go.

That left us with a 2nd-floor door to nowhere and no easy way into our new kitchen from the outside. Everything had to come in and out the front door and up/down the main staircase. Now, with the new back stairs we'll be able to easily get to/from the new kitchen and the backyard. This will be especially important once we start parking in the garage (imagine!) and hauling groceries that way.

Here you can see where the old stairs used to go, circling around two sides of the house from the upstairs kitchen. Apart from being old and rickety, we just didn't like where the stairs were placed. They went the wrong way: when we go downstairs we want to go to the left, not the right. These stairs lead in the wrong direction if you're heading to/from a car in the garage.

So with the city's blessing, we re-routed the new stairs to lead down and to the left. The new stairs will hug the house, taking advantage of the "L" shape just to the left of the doors, folding back on themselves and taking up less space than the old ones. Got it?

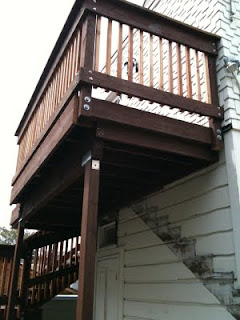
The first step to making this work is to build a new landing on the 2nd floor. Here it is being framed. It's all being built with pressure-treated lumber, with some redwood pieces where it's visible. The new landing and stairs should last a lot longer than the old ones (and they lasted 70 years).

Here's the same landing a few weeks later. It's bigger than the old one, and gives us a nice little deck just outside the kitchen/laundry door. I'm thinking this is where I might put our new meat smoker (thanks, Steve and Paul!).

And here are the new stairs. It's all dark wood now, but Kathy's already started painting it white--which is a much more tedious job than it sounds. There's a lot of surface area on those little 1x1 stringers and banisters and steps, etc...

As you can (kind of) see, these stairs head in the opposite direction from the old stairs, hugging the back of the house and passing directly behind the garage. Craftily, we planned a tiny 1-inch gap between the stairs and the garage--very close, but without touching. That's to satisfy the city, which forbids the historic structure (i.e., the house) from connecting to the non-historic garage. The gap keeps the two structures separate in the eyes of the historical committee, and also prevents us (theoretically) from stepping off the stairs onto the back "deck" of the garage.

We use the stairs every day now. It's a much shorter route when we're unloading groceries, and a great shortcut when I'm working in the backyard. Now if we can just find a way to pay for all that hourly labor...

Friday, August 26, 2011

The House of Sand and Fog


Ta-dah! Here's our more-or-less completed garage. It's unpainted, of course, but at least we've got the doors up.

I made these carriage doors myself, and they came out pretty good if I do say so. We didn't plan it that way. We got some quotes on garage doors, but even the cheapest estimate was almost $5000. The city says the doors must be wood, not metal or fiberglas. And we can't do roll-up doors because they'd block the stairs into the "attic." So that meant swing-out carriage doors were our only option. Which is fine, because that's the style we wanted anyway.

I figured heck, for $5000 I can buy all the materials for one-tenth that price and make the doors myself. How hard can it be, right?

Pretty hard, as it turns out, but it's doable. Each door is a combination of 2x4 and 2x6 frame construction on the back side and smooth MDO (medium-density overlay) ply on the front face, with 1x4 and 1x6 trim pieces on top of that. The frame pieces are held together with dowels, wood glue, and huge long bolts. The MDO facing is water-resistant and very smooth for painting, while the trim pieces add a bit of texture and character.

The doors weigh about 100 pounds each and swing on three heavy-duty ball-bearing hinges. Hanging them was a real bear. Kathy and I struggled with shims and braces, wrestling each door into place while trying to hold it steady long enough to screw the hinges in straight. And of course, it was hot that day.

The windows aren't in yet, but I'll cut and mount those from the inside. Then I'll cut diamond-shaped trim pieces to match the stained-glass diamonds on the main house. I'm hoping it'll look nice when it's all done.

Garage, Part XCXVIII


It's now late August and the garage is actually... done!

Well, almost. The professional construction is finished. Kathy and I still have to paint the garage and take care of a few small details. But the contractors have packed up, they've submitted their final invoices* and we've got the place back to ourselves.

One of the last steps was hot-mopping the "deck" portion on the back of the garage, seen here. The garage roof doesn't extend all the way over the entire garage. That would have interfered with the house, so we roofed over only the front three-quarters of the garage and left the back portion (that is, the end away from the street) flat. It was waterproofed with black roofing tar covered with a layer of white sand, and that's what this photo shows.

You can also just make out a shiny new metal scupper (gutter) running along the back edge of the garage. This catches rainwater and guides it into a rain barrel that we'll place just out of sight in the lower-right corner of the photo.

The city permit says we're not supposed to have access to this "deck" area. Otherwise it would need a safety railing around it and all sorts of other complications. We're planning to set a few flowerpots on it and that's about it.

The back end of the roof just needs a few more cedar shingles, as you can see, and then it'll be all done. At last!

*The #^&@! garage remodel cost more than the cars parked inside it. Seriously.

Monday, July 11, 2011

So Many Men, So Little Time

This garage project is taking forever.

When last we left, the garage roof had just been framed and the old doors were still on the front. All that has changed. In fact, it's now early July and the garage is almost done. 'Bout freakin' time.

By the middle of June the garage had a roof and siding, as you can see here. Our original plan had called for a door in the back of the peaked roof so we could walk into our new storage space. That didn't work. For starters, the city didn't like that idea at all, saying it would turn the garage into "living space," which would trigger all sorts of zoning problems. That turned out to be moot, because the peaked area of the garage is only about three feet high. There's no way you could walk into it, so no need for a door.

Instead, we put in a hatch. From inside the garage, we just pull a rope in the ceiling and out pops a folding ladder, like an old attic hatchway. That'll give us access to the storage space above, and convinces the city that we're not renting out the space to illegal aliens.

After the roof and hatch came weeks and weeks of... nothing. We could hear the power tools but couldn't see much progress. The guys were doing detail work to the front, making the peak match the gables on the house. They did a terrific job, but it seemed to take forever, and we're paying them by the hour.

By late June the garage doors had come off and the three remaining sides had been covered in ship-lap siding, just like the house. The center concrete post is also gone, replaced by a much narrower framed-in one. Now we're ready for doors. Hah!

The Human Stain

After sanding comes staining!

Our marathon sanding session took all weekend but that was nothing compared to the stain and finish work. Kathy and I stained all three rooms (parlor, hallway, dining room) to match the bedroom on this floor. Now there's no carpet anywhere and everything is stained the same color (except the kitchen floor, which is redwood instead of oak).

Staining large rooms is harder than you'd think. Or at least, harder than we'd thought. You have to wipe the stain off the wood after about 15 minutes, which means you can only stain as much as you can reach in that amount of time. Stain too much floor and you won't be able to wipe it off in time. Stain too little and you'll be working forever. Stain the wrong parts and you'll paint yourself into a corner. So we did each room in strips: Stain about three feet across the room, wait 15 minutes, wipe off, repeat.

After it's stained, the wood has a nice dark color, but looks a bit flat and grainy. The clear coat fixes that.

They no longer make the oil-based polyurethane clear coat that we used last year on the bedroom floor, so we had to find a water-based poly that would give us the same finish. I think we got pretty close. The threshhold strip between the bedroom and the hallway is the only place the two different finishes meet each other, and the difference there is pretty much invisible.

Applying the poly coat presents the same challenges as the stain, but for a different reason. You don't have to wipe the polyurethane off, but you do have to somehow cover the entire floor without walking on your fresh poly coat. So Kathy and I strategically divided each room into "his and hers" zones, got identical lamb's wool applicators, and worked across the floor toward the door. Last one out finishes the doorway!

Four successive coats of poly did the job, with about 4 hours drying time between each coat. Overall, it took a couple of days, with lots of TV watching and walks on the beach in between. After the first night, we tip-toed across the floor in our socks. I don't think we wore shoes upstairs for a week.

All in all, I'd have to say we did a pretty good job. We find maddening imperfections here and there, like brush marks or dust trapped in the finish coat. But it's done now, it's nice, and it's a lot better than the ratty old carpet that used to be here.

Tuesday, June 7, 2011

Portal

It is perhaps some indication of the task ahead of us that only one door in five works. There are five doors to the outside: the front door; the back door to the "milk porch;" the Dutch door in the downstairs kitchen; the door from the downstairs utility room to the backyard; and directly above it, the door from the upstairs laundry room to the back stairs.

We always go in and out the front door because it's the only one that works.

The back door onto the milk porch (so called because I imagine that's where milk bottles were delivered in decades past) is only an exit; you can't come back in that way. It's got one of those push-to-open bars on the inside so that restaurant patrons could get out in an emergency, but once outside there's no handle or lock to get back in. If we go out the back door and it slams shut behind us, it means walking around to the front of the house, up the steps, and in the front door. I keep the keys in my pocket all the time.

As an aside, all five exterior doors open outward, which is a bit odd. Front doors normally swing inward. Presumably that's a carryover from when this was a restaurant. (Except for banks and tightly packed Bangkok nightclubs, doors in public buildings always swing outward for safety.)

As far as the Dutch door in the kitchen, it's never worked all that well. For starters, the doorknob keeps coming off in my hand. We learned after the first few weeks to just leave it alone. And really, we don't spend much time in the downstairs kitchen anyway.

The rear utility-room door gets a lot of use--or it would, if we could get back in that way. Like the other back door, it's only good for going outside, not getting back in. The door's all weather-beaten and the hinges and latch are in bad shape. It looks like it's about to fall apart, and you can see daylight around the edges. We leave this door open whenever the contractors are working outside so they can get into the downstairs bathroom. Apart from that, we ignore it.

Finally, there's the one door upstairs that leads to the back stairs. Or it did, until I demolished those stairs in a fit of unrestrained enthusiasm (see March 8, 2011). We now have no direct path in or out of our main kitchen or laundry room. Groceries go up the front steps, through the front door, up the main staircase, and across the dining room. The long way around, in other words. Eventually, these stairs will get rebuilt, and this will become one of our main paths into the house. The door itself is fine (I patched it up in March) but for now I've nailed a couple of 2x4's across the doorway for safety. Wouldn't want someone stepping out into the void.

Ironically, we have keys to the inaccessible upstairs door, but not to any of the three downstairs doors. For now they'll remain merely decorative. It's only been a year.

Friday, June 3, 2011

Christmas in June


Well, this was a surprise.

Yesterday we found a small envelope on the front porch. Evidently someone had stopped by and dropped it off while we weren't looking. It had no stamp, so it wasn't mailed; just a small hand-written return address with a phone number.

Inside was this photograph. It's from around Christmastime, 2010, or about six months ago. I called the number on the envelope and talked to a very nice man, Dennis Huey, who took the picture. He and his wife had snapped a few photos when they were visiting, and he makes it his policy to always provide a copy whenever he photographs someone's house, a habit that I very much admire. He also gave us permission to post the picture here, so voila!

We can't count the number of times people have photographed our house or the one next door. Almost every night of the week we see flashbulbs outside, and on most sunny days if we happen to look out to the street we spy someone lining up a shot. And that's just when we're looking; who knows how many quick shots we've missed.We often wonder, how did the picture come out?, but this is the first time we've actually seen the result. Thanks, Dennis.

Sunday, May 22, 2011

Got Wood? II

A couple of hardwood areas needed special repairs. Apparently, during the carpeting process the installers felt it necessary to remove a few floorboards, which they patched with plywood. That's fine if it's hidden under a carpet but not so cool if you're gonna be exposing the floors.

Trouble is, that flooring isn't made anymore. It's all American white oak cut in two-inch by half-inch boards with tongue-and-groove. Oak flooring isn't hard to find, but it's tough to get the right dimensions. Modern T&G flooring is either wider, thicker, or both. We needed an exact match.

None of the local lumberyards had any good options, and the local floor stores came up dry, too. A local mill could make 'em for us, but the price would be prohibitive. Finally, we came across one source that could get us a small amount (about 20 square feet) if I paid in cash and didn't need a receipt. My favorite kind.

A little cutting, trimming, and shaping later, we've got our replacement boards. They don't seem to take stain quite as readily as the original boards, but that may be because they're newer/younger. We're pretty sure this floor was originally laid in 1936, so the wood itself is probably around 100 years old. A second stain coat may do the trick.

Here you can see the new and old boards together. The foreground and upper left are old wood; the upper right has the new stuff. There's a seam between the two areas because that's how we found it. The previous owners had evidently cut the floor and/or moved a wall in this area. We can't eliminate the cut but at least we can match the wood as closely as possible and then put a threshold strip over the seam.

The Sands of Time

After ripping out all the second-floor carpet, we chemically stripped (most of) the goo that was holding down the carpet padding. Some rooms were worse than others, but they all needed attention.

That job completed, the next step was to sand down the floors and (we hoped) sand off the last remnants of goo that the toxic sludge couldn't take off. We rented the very same floor sander we used last May--exactly one year ago!--and hauled that sucker upstairs again.

Now a year older and wiser, we knew ahead of time that sanding around 800 square feet of floor space was gonna generate a lot of dust. So we taped off the doorways and put towels under doors to minimize the mess. There's no way to prevent the sawdust from going down the stairs, so we just... hoped. After sealing off everything as best we could, Kathy vacuumed up, as you can see.

I gotta say, 60-grit sandpaper under a 200-pound floor sander tears through rough patches pretty durn quick. It took off the worst of the adhesive goo real nice. Very encouraging. But after the first initial scrape, it starts to get boring and tedious. And it makes my hands go numb.

We did three rooms, and each room got sanded three times, each time with finer sandpaper. The sandpaper disks load up with dust pretty quickly, so you have to stop often and clean off or change the sandpaper. The weekend rental for the floor sander was about $75; we spent over $120 on sandpaper for it and filled an entire wastebasket with discarded discs.

But the end result was pretty nice: smooth floors stripped of any goo, gunk, glue, or residual stain. Now for the fun part.

Wednesday, May 18, 2011

Roof-Roof


The garage is coming along. We're on Week Four now, and the roofing materials were delivered and installed. We have a waterproof roof now, which is a good thing because it started raining a few days ago. Very unseasonable for May, but there you go.

The flat top is gone, replaced with a peaked roof. The overall idea is to match the style of the house, and we're pretty close. The main roof is steep: a 12/12 or 45-degree pitch. The city won't allow us to do that on the garage because it would violate some height ordinance or other, so it's 6/12, or half as steep. A steeper roof would have given us more storage underneath, but this is okay, too.


You can't see it from the pictures yet, but there's a lot of detail work going on inside the triangular gable area facing the street. That will ultimately get trimmed out to match the house, too, which requires a lot of molding and shingles and fussy bits. Then, a small window will get set into the gable, with a matching vent (but no window) on the opposite end for ventilation.


The old flat roof was recessed below the tops of the concrete walls; the new peaked roof sits on top of the walls. From inside the garage, the "ceiling" is about a foot higher than it used to be, and that's not even counting the peaked area. That also gives us more storage space (and headroom) inside the garage. Enough for a four-poster car lift...

But that's for another day.

Thursday, May 5, 2011

Garage

It's ironic, really. The more we do to the house the less time we have to write about it.

It's been more than a month since our last installment, but that's not because we've slacked off. Just the opposite, actually. We're still working on the wood floors, finishing up the bathroom, we completely redocorated the master bedroom, worked on some details in the laundry room, and -- the big new project -- started remodeling the garage. Kathy's been busy with tax season and my racing season has just started. Never a dull moment.

You'll recall that the garage was, shall we say, butt ugly. Even the City of Pacific Grove agreed, granting us rare permission to demolish an historic structure, calling it "an eyesore" during the official public hearing. It hasn't been used as a garage in decades, acting instead as a storage shed for the most recent restaurant(s). It couldn't accommodate a car, much less two. There was a rotted man-door on one side and decrepit swing-out doors on the other that hadn't been opened in years. I replaced some of the rotted wood and put on new hinges a few months ago, which turned out to be a complete waste of time because we haven't opened the doors since.

We decided not to demolish the garage because we'd only be able to replace it with one exactly the same size. Even though it's undersized by modern standards (about 19x19 instead of 20x20), that's close enough for our two cars once we get proper doors on.

The really ugly part is the roof, however. It's flat-topped tar paper. The whole structure looks more like a concrete bomb shelter than a garage, and our neighbors (with one exception) seem thrilled we're redoing it. The plan is to put a peaked roof on top and two sets of swing-out carriage doors on the front. We'll cover the poured concrete exterior with wooden ship lap siding, just like the first floor of the house. When it's done, the garage should look more or less like it belongs to the house, and to the rest of the neighborhood.

Permits took several months, but demolition and construction finally started last week (late April). The flat roof came off in a few days, followed by framing of the new roof. Because we're removing the center concrete support from the front of the garage, it needs an engineered steel beam to reinforce the opening. That arrived yesterday and got installed under the watchful eye of an inspector. It's bolted, screwed, epoxied (and probably duct-taped) in place over the front opening where the doors will go.

From inside the garage, the "ceiling" is about a foot higher than it was before, because the new roof sits on top of the concrete walls instead of being set inside the walls. That will give us a bit more storage and headroom inside, but the real benefit will be overhead. The peaked roof will give us a few hundred cubic feet of much-needed storage.

The new peaked roof will cover only the front two-thirds of the garage. The back third will be flat, like a deck. That's because the garage is too close to the house to accommodate a peaked roof all the way around without interfering with the house's roof. It'll look normal from the street, and give us a small raised deck on the sunny side of the house. We're looking forward to it.

Tuesday, March 22, 2011

Floor Wars III

First, there was the bedroom.

Then came the kitchen.

Now it's time for the dining room. And this time, they're not taking any prisoners.

Floor Wars III: Chemical Warfare.

We've always wanted to remove the carpet from the second-floor rooms. We did the master bedroom almost a year ago (has it really been that long?) and the kitchen floor got redone (or revealed, really) just a few months ago. The carpet's old, red, and badly stained. Running a restaurant will do that. No amount of cleaning would get the big lasagna spills off the carpet. So out it goes!

We took a little peek under the dining room carpet a few months back. We were hopeful that we'd find hardwood underneath, like we did in the bedroom. And so it turned out to be: nice oak planks under the padding and tack strips.

On Sunday Kathy and I took a knife to the dining room carpet and ripped it out in chunks. It was all over in less than an hour. (Hey, we're getting good at this!) But alas, the floor was badly stained; it was even worse than the paint splatters we'd found on the bedroom floor. This one's got big splotches of green adhesive goo. It's the consistency of green Crayola crayon melted all over the wood.

Our trusty eco-friendly orange-flavored stripper hardly did anything to it. It smelled nice, but it just wasn't taking the adhesive off. So we called out the big guns. I got some extra-nasty stuff from "Uri." It comes in cans labeled in Russian, straight from Chernobyl. The fumes make you see things. The can gets warm for no reason. You have to throw the brushes away after 15 minutes. This stuff works.

Even so, it took four coats to remove the larger spills. I put it on, stand back for 20 minutes, then scrape the green mutagenic ooze off into a bucket. Lather, rinse, repeat. I'm afraid to leave it on the bare wood; it'll probably start a fire.

At any rate, the floor is mostly stripped now, as are my fingers. My normally reliable nitrile gloves disintegrated on my hands. I found it's better to work bare-handed, because then at least you remember not to scratch your nose.

Once the evil smell subsides we'll follow the usual pattern: sand, stain, and topcoat. We're going to match the stain we used in the bedroom because we like it and because we want the floors on this level to match. Changing stains between rooms would just look weird. Like having green splotches in your dining room.

Wednesday, March 16, 2011

Before and After: Door


One of the many small projects I've been working on is the laundry room door. This is upstairs, just off the kitchen, and leads to the outside stairs (which are now gone). Like everything else in this little laundry room, the door was ragged and nasty.

It has some panels of colored glass in it, which is nice, but the window putty was falling out and the wind whistled around some of the glass panes. The woodwork was in bad shape, too. In particular, the lower left panel was missing entirely and had been boarded up with a sheet of plywood. You can see it here in the "before" picture.

I took out each of the nine glass panels, scraped off all the old putty, cleaned the glass, put them back in, put in new glazier's points and replaced all the putty. This took a lot longer than I expected; puttying takes a long time!

Then I fabricated a new wooden panel out of MDF. Since the original panel used tongue-and-groove, there was no way to insert a new panel without taking the entire door apart. It's kind of like one of those 15-square puzzles. So I made the panel out of eight interlocking pieces (four inside and four outside) so that it fit snugly into the opening and was the same thickness as the originals. Then I glued the raised piece into the middle after routing and beveling it to match the others. A little bead of caulk softened the edges enough that the center piece looks like part of the main panel and not glued on.

I also took off the brass doorknobs and hardware and stripped the paint off everything. This plate was completely white before; it had been painted over--many times--and was nearly invisible against the white door. A little stripping, scraping, and polishing and now they look pretty good.

Some of the smaller wood trim pieces have small details that 20-odd layers of paint had obscured. I stripped these as best I could, with multiple applications of eco-friendly wood stripper, but in the end I resorted to scraping with a screwdriver and pick. I got most of the old paint out, but not all.

Now I've glued, nailed, and puttied everything back together and slapped on a bit of primer. Here's the almost-finished door, with the new panel on the left and the original on the right. Not bad, huh?

I'll wait for the putty to set before I paint the top half of the door. I don't want to disturb the glass while I scrape away paint splatters. Besides, it gives me an excuse to take some time off from the door.

Tuesday, March 8, 2011

Up the Non-Staircase


Demolition is always more fun than construction.

It's usually easier, too. Or at least, is requires less skill and finesse. I can hit, beat, and break stuff with the best of 'em. Today's example: our back staircase.

These stairs went from the backyard up to the second-floor laundry room. They turned the corner around two sides of the house, as you can see. They're not original; they were built in the 1930s when the house was converted into two apartments. The second-floor renters needed a way to get in/out of their upstairs unit without disturbing the ground-floor occupants,. Hence, these stairs.

They were built entirely of redwood, just like everything else in the house. Sadly, even redwood decays over time and these things had to go. In fact, they were officially condemned by the city before we even bought the house. It's all we could do to close the deal without demolishing them first. But we did have to promise to never, ever use them. (I promise. Cross my heart.)

Because of that, the city had no problem approving our plans to rebuild the steps in a different location. We never did like these stairs much, and probably would have demolished them eventually anyway. The red-tag notice from the city just gave us a convenient government-approved excuse.

That's a lot of redwood to throw away. Some of it was fine. A few of the boards came off in one piece and were still bright salmon-pink inside. Others were rotted through and really needed to go. Naturally, the rotted boards came off easily. It's the good ones that were hard to remove.

At any rate, the upstairs door is now locked shut, and I've nailed a few 2x4's across the doorway just in case. We're this close to starting on the new stairs (at least, that's what the builder keeps telling us) so we figured it was time to take these down. Besides, the weather was nice and it's always fun to destroy stuff.

Monday, February 14, 2011

Happy Feet


One of the best things we did when remodeling the main bathroom was install a heated floor. There's no heat in most of the house, remember. The ground floor has forced air but the 2nd and 3rd floors have no heat to speak of, and we spend most of our time on the 2nd floor. That's where the main bedroom, bathroom, kitchen, and laundry room are all located.

So rather than install some sort of air ducts or radiators, we put in a heated floor. This is basically an electric blanket under the tile. It's connected to a thermostat and timer, so it only comes on for a few hours in the morning and again in the evening. It's set to 88 degrees: like a warm sidewalk in the summer sun.

There's nothing quite so wonderful as crawling out from under the blankets on a February morning and padding into the bathroom with its warm floor. We've been known to "accidentally" drop our bath towels before a shower so they get toasty.

Between the instant hot water from the tankless water heater and the auto-warming floor, I suspect this bathroom is a lot more comfortable than the Victorians ever imagined.

Monday, February 7, 2011

The Real Deal


Last week I made a pilgrimage.

My big brother and I went to Rejuvenation Hardware in downtown Portland, Oregon. Rejuvenation Hardware (not to be confused with Restoration Hardware) carries all things old and historic, and is housed in exactly the sort of building you'd expect: an old brick structure that looks like it was a warehouse.

The front of the store mimics their catalog. It's new/old reproduction light fixtures, furniture, and plumbing. Clawfoot tubs, shower fixtures, door knobs, miscellaneous hardware--that kind of stuff. Like Pottery Barn for the old-house set. We spent a good half-hour browsing through all their wares.

Then we found the back of the store.

The back of Rejuvenation's HQ is an Aladdin's cave of awesomeness. Whereas the front is all shiny reproductions, the back is the real thing. Old doors reclaimed from local houses; iron heater grates with the paint still on them; thousands of doorknobs, locks, strike plates, jambs, hinges, skeleton keys, latches... and on and on. Stained glass panels hung safely out of reach while we fingered and fondled old pushbutton electrical switches, tin mailboxes, crystal cabinet knobs, and one huge and scary-looking proto-circuit breaker from Dr. Frankenstein's lab. Too much good stuff.

In the end, I bought only what I could carry home on the airplane: four genuine brass light-switch cover plates. I've already put them up, but I'll take them down later and polish 'em up a bit. My fingers smell like brass and my head is full of dreams of the next trip.

Tuesday, January 4, 2011

Still Life with Floor


Okay, nothing to see here. I just took a quick shot of our "new" kitchen floor, now that it's all finished.

We've used the kitchen for a grand total of about a week now, and everything seems to be in order. We're glad it's over.

It's Beginning To Look...


...a lot like Christmas.

This is a quick-and dirty iPhone photo of the house. Sorry I can't manage f-stops and exposures like a pro. I'm sure it could look nice.

We wanted to string lights on the top floor, too, but we couldn't reach it. A friend tipped us to a company that strings lights professionally, but they wanted $750! I could buy a pretty nice ladder for that (and hire a guy from the Home Depot parking lot to do the work). So we got another quote from another company; they wanted $1100 and wouldn't do the top floor at all. Sheesh. So we did what we could with the equipment (and talent) that we had.

In case you're wondering, they're all "cool white" LED lights, and even with 3500+ of 'em burning, they use less combined electricity than a single 100-watt bulb. Amazing.

Sailor's Horn Pipe

This is an odd bit of hardware we found lurking in the kitchen wall.

Kathy calls it Captain Cook's Stovepipe and we think it's part of a boiler flue or vent. It's up high on the wall of the ground floor, and weighs a ton. It looks like simple galvanized metal tubing in the photo, but that's actually covering a very thick and heavy ceramic pipe inside. The inside wall of the ceramic pipe was pretty dirty and sooty, suggesting that it was the flue from a wood- or coal-burning boiler or furnace.

This big ugly thing was mounted up high, as you can see. It makes a 90-degree bend, pointing up (to the second floor) and sideways (into the ground-floor kitchen). Our guess is that the boiler/furnace was installed where the ladies' room is now, and it vented over the kitchen ceiling to the outside.

I thought it'd be easy to remove -- it's just a bit of sheet metal, right? -- but that was before I got up on the ladder. My first clue was the quarter-inch steel plate holding it up. And the six-inch nails holding that in. And the fact the nails were spaced just an inch apart. And the doubled studs. Hmmm, maybe this thing needs a lot of bracing...

Anyway, down it came. It's going in the "weird stuff" box in the garage where we keep everything that's historically or architecturally interesting. We're up to several boxes now. We'll need another house to store all the house stuff!